
Basic Computer Operations for Desktops or Laptops

Now that you know what a computer is, what parts it has, and what makes it work, it’s time to learn how to use a computer! We’re going to start with powering on and work our way to opening applications.
Powering On
Like most electronic devices, a computer can be turned on or off. Often the terms “powering on” or “booting up” are used. All computer devices will have a power button. After pushing it, it will take anywhere from a few seconds to a couple minutes before the computer is ready for use. You will know by the appearance of the login screen. It is important to note, that computers, unlike other electric devices, are not shut off by simply pushing the power button again. How to shut down is dependent upon the operating system. If the computer has Microsoft Windows, simply click the windows button on the lower left of the screen, then the power button on the screen, followed by the words “shut down.”
An alternative to shutting down is going to “sleep” mode. This is a power-saving measure and occurs after a certain time period of non-use. When this happens the screen will either go black or a screen-saver image will appear. To “wake” the computer up, move the mouse or hit any key on the keyboard.
Login
How the login screen looks will depend upon your operating system. For Windows, how you log in depends upon if you have an account on the computer you are using or if you are using a public computer.
If you have a new computer which you have not used yet: During the first use, the setup process will guide you through setting up the computer and creating your user account.
If you are the only user account on the computer: Hit the “enter” key on the keyboard and a box to enter your password will appear. Type in your password and hit “enter” on the keyboard.
If you have an account on a computer with more than one user account: A list of user names will appear in the lower-left of the login screen. Click on your user name and enter your password.
If you are using a public computer: Public computers may not require that users login; however, if it does, you will need to ask someone for login directions.
If you are using a Wichita State computer: You will need to use you myWSU credentials to login to any computer.
Using the Keyboard
We’ve already covered what a keyboard is, so now we’re ready to learn about the important areas of a keyboard and what they do. In the image below, different sections of the keyboard are indicated. It’s important to remember that although most keyboards are fairly similar, they will all vary slightly.
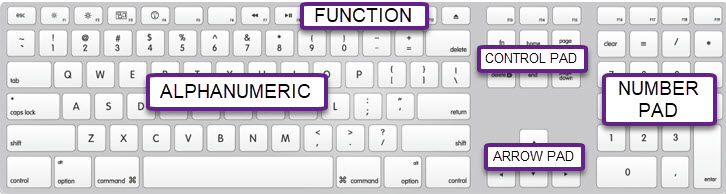
Alphanumeric
The alphanumeric section of the keyboard is the primary and most used portion of the keyboard. It contains the letters, numbers, punctuation, and symbol keys. This section is where the Enter, Shift, Backspace, Space bar, and Windows or Home keys are located.
Function Keys
Function keys are along the top row of the keyboard and begin with the letter F followed by a number and are used as shortcut keys to perform frequent tasks. As you become more advanced, you may wish to learn about the functions of each F key and how to use them.
Control Pad
Control pad keys allow for control over text manipulation and cursor placement. Common buttons in this pad are Insert, Home, Page Up, Delete, End, and Page Down.
Arrow Pad
The four arrow keys allow you to move the cursor up, down, right, and left.
Numberpad
The numberpad is generally offered on desktop keyboards but not on laptop keyboards; however, there are some desktops keyboards without a numberpad and some laptops with a numberpad. If your keyboard has one, it gives convenient access to the number and basic calculation keys.
Using the Mouse
If you’ve made it this far, you already have some serious mouse experience. You should already have a good sense of what a mouse is for and how to select items on the screen with it.
Parts of the mouse
For this course, you’ve probably only been using then left button to click on things, but most mouses also have a right-click button and a wheel. The right-click button will give you a dropdown menu of selections. The wheel allows for easy scrolling up and down the page.
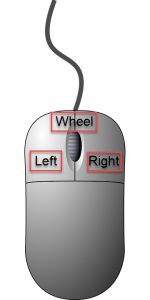
Holding and moving the mouse
The mouse is shaped to fit in the palm of your hand. Place your hand over the mouse, with your thumb and pinky on the sides. Your index finger should rest upon the left button and your middle finger on the right button. Relax your hand and make sure that your hand is in line with your arm – don’t have your wrist at an angle, which could create stress or injury to the wrist with extended use. Simply move the mouse to move the cursor on the screen and click the left button as needed by pressing down and letting up, similar to pushing buttons on a phone.
Highlighting with the mouse
In some situations you may wish to highlight something on your screen. This could be text that needs to be a different size, something you need to delete, something you need to move, etc. To highlight, place your mouse over the image or text and left-click on the mouse. Without releasing the button, move the pointer to the opposite end of what you want highlighted, and release the button. For instance, if you wanted to highlight this sentence, you would click on the capital “F” at the beginning and drag over the entire sentence, letting up on the button here.
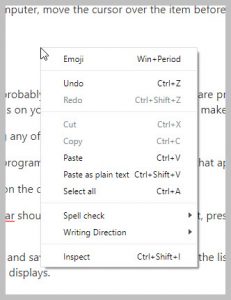
Right-clicking with the mouse
When you right-click on anything on the computer, move the cursor over the item before clicking. Once you click, a menu should appear such as the one in the image below. To select any option in the menu, hover the cursor over the selection and left-click.
Opening Apps
Now that you know the basics of operating a computer, you’ll want to start using the computer and for that we’ll need to open software applications or “apps.” There are several ways in which you can open the needed app. The two most straight-forward ways are explained below.
- The desktop will likely have app icons, or shortcuts, on it. To open one, hover the mouse over the app and double-click (click twice in succession) with the left side button on the mouse.
- Click on the Start button in the lower-left, which is also the “Windows” icon. Then click on “All Programs.” This will open a list of apps; just click on the appropriate one.
Continue to Quiz: You have now completed this course and are ready to take the quiz, for which you have unlimited attempts. Please click Mark Complete to be advanced to the quiz. If you are not automatically directed, simply click on the quiz in the navigation menu, found on the left side of your screen.